How to perform DMARC testing
AI disclosure: This page was written by AI, guided by me.
This page details how to perform DMARC testing. It covers what DMARC, SPF and DKIM are, and then how to set up and validate the records, save the reports, and visualise the results.
What is DMARC?
DMARC (Domain-based Message Authentication, Reporting & Conformance) is a protocol that uses SPF (Sender Policy Framework) and DKIM (DomainKeys Identified Mail) to determine the authenticity of an e-mail. An example record looks as follows:
v=DMARC1; p=reject; rua=mailto:[email protected],mailto:[email protected]; ruf=mailto:[email protected]
Where:
v=DMARC1— the version of DMARC.p=reject— the policy that tells the receiver what to do with e-mail that fails. Options arereject,quarantine, ornone.rua=...— tells the receiving server where to send aggregate reports (daily summaries).ruf=...— tells the receiving server where to send forensic reports (individual messages).
What is SPF?
SPF (Sender Policy Framework) is a record confirming a permitted list of IP addresses that are allowed to send e-mail for the domain, and is added as a DNS TXT record. It looks as follows:
v=spf1 include:sendgrid.net include:_spf.google.com -all
Where:
v=spf1— the framework version. Version 1 is the only one ever made, so this is always the same.ipv4— a valid IP address (or range) that’s permitted to send e-mail.include— a hostname that’s permitted to send e-mail. Hostnames are resolved recursively to determine the list of IP addresses.- The final qualifier denotes the action to take if the check fails (in
descending order of security):
-all(HardFail — any message that fails the check should be rejected)~all(SoftFail — accept, but mark the message)+all(Pass — any server can send mail on behalf of the domain)?all(Neutral — no policy)
What is DKIM?
DKIM (DomainKeys Identified Mail) is a cryptographic technology for senders to sign their messages with a public key, ensuring the message hasn’t been tampered with during transport. It works as follows:
- The sender performs a hashing function on the body of the e-mail, then encrypts this using their private key (signing).
- The receiver looks up the corresponding public key from
dkimselector._domainkey.example.com. - The receiver uses the public key to decrypt the DKIM header to retrieve the hash of the body of the e-mail.
- The receiver performs the same hashing function on the body of the message, and compares the result to the one they just decrypted.
- If it matches, this confirms that the message hasn’t been tampered with, and that only the sender could have sent it. If it doesn’t match, then the message was either changed during transit, or signed with a different (possibly malicious) key.
Why is this important?
Ensuring that the e-mail you send adheres to SPF and DKIM gives recipients an extra layer of assurance that messages coming from your domain are legitimate, and that you take security seriously. Additionally, some e-mail providers (like Gmail) will automatically mark mail that either contains invalid checks, or doesn’t contain checks at all, as spam.
How to test
Set up DNS records
First, set up the two DNS records (SPF and DKIM) as above, and test that they return valid results. This can be done using the MXToolBox SuperTool.
Save DMARC records
Once the records have been set up, DMARC reports will be sent to the nominated address. If this is a Google group, then you’ll want to make sure you’re a member, so that the messages arrive in your inbox.
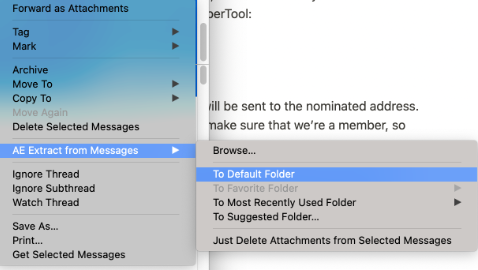
The DMARC reports are sent as attachments. The easiest way I’ve found to save multiple attachments is with the Thunderbird e-mail client and the Attachment Extractor Continued extension. There are some limitations with versions, so I recommend Attachment Extractor Continued 3.0.9 and the latest supported Thunderbird 78.13.
Install the plugin, then highlight the messages with attachments and select AE Extract from Messages → To Default Folder:
Visualise the results
Create an offline virtual machine (VM) and install dmarc-visualizer:
git clone https://github.com/debricked/dmarc-visualizer.git
Send the GZIP files to the tool, extract the results, and you can then make visualisations.
Let me know what you think of this article on twitter @lukahn!